

What Is Blue-Green Deployment?
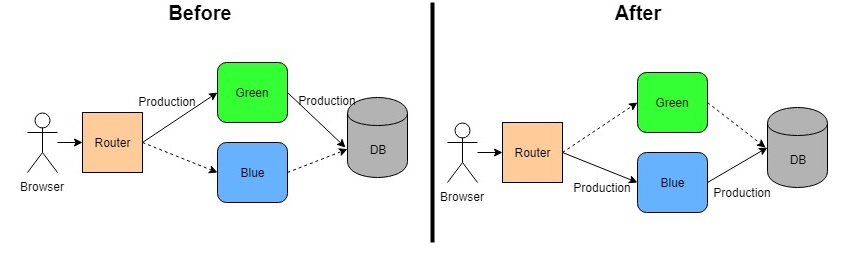
Blue-green deployment is a technique that enables continuous delivery to production with reduced downtime and risk. It achieves this by running two identical production environments called Blue and Green. Let's assume, Green is the existing live instance and Blue is the new version of the application. At any time, only one of the environments is live, with the live environment serving all production traffic.
What Are The Benefits?
- It helps to reduce the downtime and even reduces it to zero depending on the application design and deployment approach.
- It gives a rapid way of rollback of the application in case of production issue.
- It helps to build confidence to business users as testing of new version can be done in Production in isolation before rollout.
Complexity Added By Cloud-Native Applications
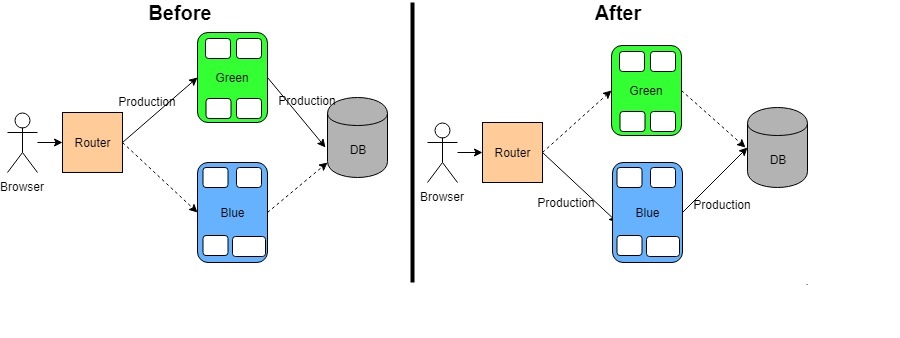
Blue-Green deployment is simple when you have one instance of an application running. But with a cloud-native architecture, more and more instances are being created for each application to achieve high availability, resiliency, and distributed architecture. This adds the complexity of implementing the Blue-Green deployment without an outage. Let's understand the several use cases and see how to resolve those complexities.
Common Use Cases and Solutions
Applications which have a Blue version that can run along with a Green version without business disruption is the most simple use case. While instances of the Blue version are being introduced, Green can slowly be offloaded and shut down eventually. This will not have any impact on the Business application as both versions can run in parallel. No outage or wrong behavior will be observed.
Applications which have a Blue version that is not compatible with Green version is a bit complicated as both version cannot run together so we cannot introduce Blue instances one by one while Green instances being offloaded in parallel. To resolve this:
- All the Blue instances have to be up and running while Router is still pointing to Green instances.
- Once all Blue instances are up then Router configuration to be changed to point it to Blue instances.
- It would cause a momentary outage as it may take time for Router to register with all the Blue instances and do load balancing as well.
Applications which have DB changes while moving from Green to Blue version is one of the complex scenarios where the Blue version will have some DB changes as well. The reason is if you apply the DB changes while Green is running it may break the existing application and outage will be caused.
Also, if there is a Production issue once Blue version is installed, rollback time will be increased and will lead to further outage to recover.
The best approach to solve this issue:
- First, separate the DB changes from application changes.
- Second, All DB schema changes has to be scripted.
- Third, the script has to be refactored in such way that it supports both Green and Blue version of application.
- Apply those changes before deploying the Blue version. Test if Green is working fine so that we have one intermediate rollback point.
- Now apply Blue version change. If everything works fine, remove the support of db changes for Green version.
Applications which have transactions running on Green application while Blue is introduced is another complex use case. What happens while the user is in middle of a transaction and you switch him from Green to Blue instance? It may behave weirdly if not handled properly. To resolve this:
- Either handle the transaction at the application level in such a way that Blue becomes backup of the Green and any transaction which user is running can be handled by new instance without disruption.
- Or, make your application as read-only while you are switching from Green to Blue instances. In that way, your application will be up for certain users to view information and after deployment can be opened for all users. This option will flush out maximum of the issues may happen due to switching.
Now, if you look at all the practical scenarios, you will understand that depending on the deployment approach for Blue-Green, you may or may not have downtime. But using above solutions, you can minimize the downtime and increase the availability for your applications.
Now, let's talk about how some of the Cloud Platforms helps you implement the Blue-Green deployment.
Implementation for PCF and AWS
PCF Blue-Green Approaches
Manual Approach
PCF routes request to the application instances through its router component. When any application is pushed to PCF, it creates a router URL which is mapped to the application instance running.
Assuming a Green application is already running.
First, the FrCF Router will be mapped with the Green application e.g. sample.example.com. Here "sample" is hostname and "example.com" is a domain name.
Now push the Blue app with a different hostname. For example:
It will create the route url sample-temp.example.com
Now map the original route to Blue application. It will now do load balancing of the requests to both Green and Blue application
This will have sample.example.com pointing to both Green and Blue.
Next, un-map the route from Green application. This will stop sending requests to Green application.
The last step is to remove the temporary route mapping to Blue application. Also, the Green application be deleted as well.
Automated Approach
CF community provides a plugin which automates the above manual process. The plugin takes care of the following steps packaged into one command:
- Pushes the current version of the app with a new name
- Optionally runs smoke tests against the newly pushed app to verify the deployment
- If smoke the tests fail, the newly pushed app gets marked as failed and left around for investigation.
- If smoke tests pass, remaps routes from the currently live app to the newly deployed app.
- Cleans up versions of the app no longer in use
AWS Blue-Green Approaches
Use Case 1 - Application Has One EC2 Instance with Elastic IP address
In this case, Elastic IPs are the simplest way to implement the blue-green.
- Launch a new EC2 instance, configure it, deploy the Blue version of your system, and test it.
- When it is ready for production, reassign the Elastic IP from the Green instance to the Blue one. The switch will be transparent to the users and traffic will be redirected almost immediately to the new instance.
Use Case 2 - Application Having Multiple EC2 Instances and Running Using Auto Scaling Group Along with ALB.
Auto Scaling Group helps to configure scaling out and down of the EC2 instances. It also can be associate with ALB which helps to register and de-register the EC2 instances with ALB.
- Let's assume that there is already a Launch Configuration done for Green version of application instances and registered with ALB.
- Create a Launch Configuration for Blue version. Create the Auto Scaling Group and attach it with ALB serving the Blue Instances.
- Once Registration is completed of EC2 instances with ALB, ALB will load balance the requests to go to both Green and Blue version.
- Now, Change the configuration for Green version marking desired number of instances to zero. This will shut down all the Green instances.
- Delete the Green Auto scaling group and launch configuration.
Note: Please note that in this approach, there will be time duration when requests will be handled by both Green and Blue instances. So, this can be applied only when both are compatible to each other.
Use Case 3 - Application Running Behind Route53
Most applications would configure Route53 to have a meaningful short name of the URL as ALB would be generally a long URL. So now, we can implement the Blue Green deployment outside AWS by changing the CNAME records in DNS.
- Create a Blue environment. It can be single EC2 instance or ALB.
- Update the resource record set to point the domain to the Blue instance or the Blue ALB.
- Route53 has an AWS-specific extension to DNS that integrates with the other AWS services, and is cheaper too -- alias resource record sets. This can be used for pointing to ALB as they point to a specific AWS resource: a CloudFront distribution, an ELB, an S3 bucket serving a static website, or another Route53 resource record set in the same hosted zone.
- Route53 also does have a Weighted Round Robin. To use it, it needs to be associated with multiple answers for the same domain/sub-domain and assign a weight between 0-255 to each entry. When processing a DNS query, Route53 will select one answer using a probability calculated based on those weights. To perform the Blue-Green switch it needs to have an existing entry for the current “Green” environment with weight 255 and a new entry for the “Blue” environment with weight 0. Then, simply swap those weights to redirect traffic from Green to Blue.
Note: Please note, DNS record changes take time to reflect and we don't have any control when user will perceive it.
I know, AWS has a lot of other architectures using ECS, Lambda, etc. And there will be a different strategy to handle the Blue-Green deployment. There are other cloud platforms as well which do have one or other strategy to implement the Blue-Green deployment. I may talk about them once I get a chance to do some hands-on with those features.
Please do share your thoughts through comments if you find any other way of implementing this in PCF and AWS.
November 01, 2018
Read more ...


